How to Draw a Calligraphic Bird Flourish in Nine Steps
Bird flourishes occupy a special place in the history of Western calligraphy. Among ornamental and illustrative penwork, birds are perhaps the most repeated motif over the past three hundred years. Their curved bodies, arced wings, sweeping tails, and long feathers beautifully suited to the fluid strokes of a pointed calligraphy pen.
Flourishing exists in curious balance between discipline and play, precision and improvisation. Even the most ornate historical examples relied on both technical control and spontaneous movement. Many of these calligraphic illustrations emerged from a tradition known as “offhand flourishing”—decorative steel-nib penwork drawn freehand with rapid, flowing arm movements. In nineteenth-century ornamental penmanship especially, flourishing artists used this technique to create incredibly elaborate animals, scrolls, borders, and other decorative designs entirely from calligraphic strokes.
The bird flourish illustration I created for this tutorial takes inspiration from historical offhand flourishing, while simplifying the forms into a more modern calligraphy style. You can download a free practice sheet below to print and follow along with ink on paper, or to upload into Procreate for digital practice.
Examples of nineteenth-century calligraphic bird flourishing. Click to enlarge.
• free worksheets •
Download Your Practice Sheets
Follow along with this tutorial using these free practice sheets.
Print them for ink-on-paper practice or import the images into Procreate.
• written tutorial •
How to Draw a Bird Flourish
in Nine Steps
click an image to enlarge it.
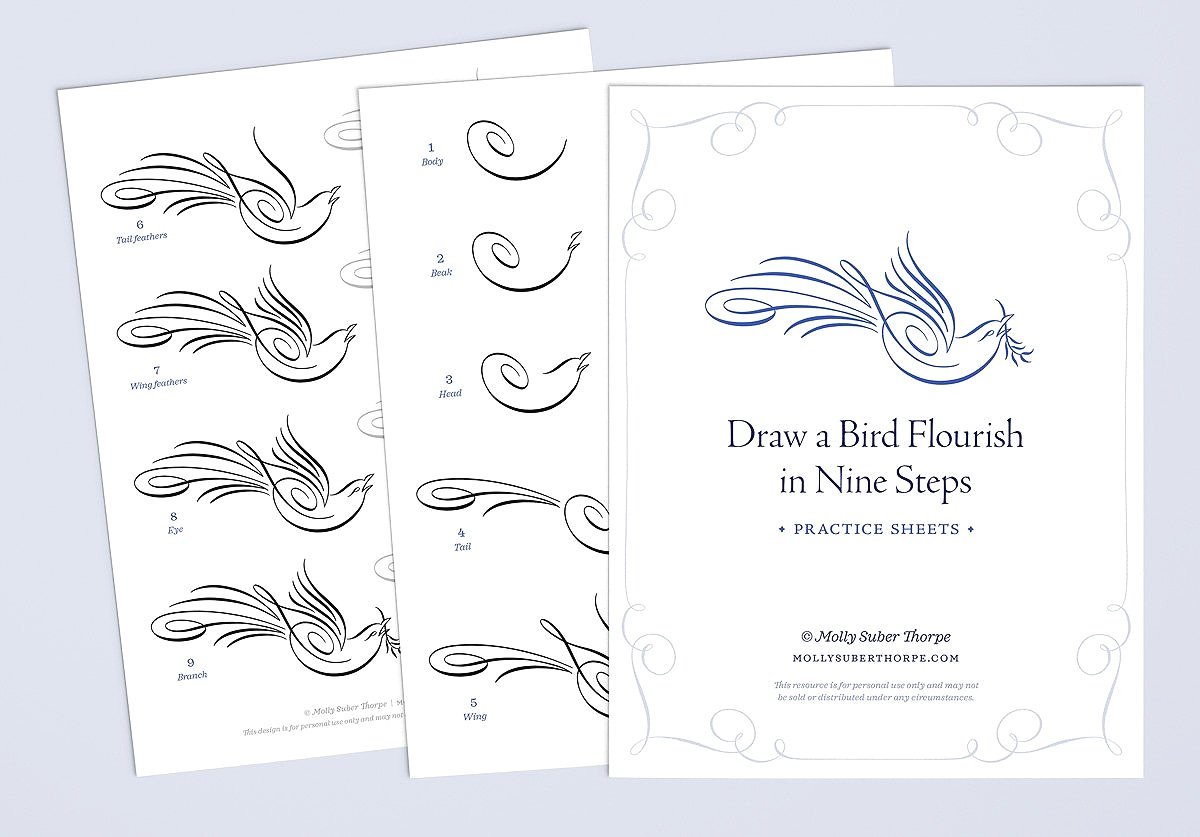
1.
Bird Body
Start with a loose, freehand swirl. This stroke starts from the right, moves downward to the left, and swirls clockwise. Don’t worry if your flourish is rounder or narrower than mine—birds come in lots of shapes and sizes.
2.
Beak
Return to the starting point of the first stroke. Draw your pen upward and create four small strokes which meet and change direction at sharp points. This is your bird’s beak.
3.
Head
The bird’s head is one simple downstroke, which should be drawn from right to left. Start at the end point of the beak and move down and to the left as you draw. Increasing your pressure toward the beginning and decreasing again toward the end creates the beautiful swell in the stroke’s width.
4.
Tail
Now for some really fun flourishing. The primary shape of the tail consists of a long, overlapping flourish, but it’s not as hard as it looks. Start close to the left side of the bird’s body, but leave a small space between the body and tail. Draw your first stroke to the left and slightly upward. When the length of this stroke is just a bit longer than the bird’s body, curve the stroke down into the swirl pictured above. Once your pen comes back to just below your starting point, draw a final curve by moving left and downward.
5.
Wing
Starting at the top tip of the wing, draw your pen down in a loose, S-shaped curve. End this stroke in the space between the bird’s head and body. Draw your pen upward again, curving around the swirl of the body. Loop over into a downstroke, which will intersect the bird’s body, and end roughly in the center of its belly.
6.
Tail Feathers
It’s time to fill in the spaces above and below the tail with feathers. Draw simple, curved strokes—two above and one below—which follow the general curved shape of the tail itself.
7.
Wing Feathers
Similarly, fill in the space of the wing with three curved downstrokes of varying lengths. I like to start with the middle stroke, which I make the longest, then add two on either side to fill the remaining space.
8.
Eye
Don’t be fooled by the size of this stroke. It may be small but its placement is important, so take a moment to map out the motion in the air before you touch pen to paper. Start on the underside of the eye, by drawing a small upward curve with slight pressure on the pen, then end in a small loop that connects to roughly the middle of the curve.
9.
Olive Branch
You could certainly consider your bird flourish complete after Step 8, but I like to add an olive branch as a finishing touch. Start with the main stem. Draw a downstroke beginning above the beak and ending just at its top edge. Then continue the stroke by coming out of the upper beak, crossing over the lower beak, and curving gently to the right. Add the leaves as short, curved strokes that begin at the stem and move outward.
Voilà!
One of the most beautiful things about offhand flourishing—as with handwriting—is that no two forms will ever be identical. As you become more comfortable with the stroke pattern and structure, experiment: lengthen the tail, exaggerate the neck curve, tighten and loosen the swirls, widen the wings. Above all, enjoy the process.
Don’t forget to download your bird flourish worksheets:
And subscribe to my newsletter to access even more free practice pages.
My Lettering Toolkit is an archive of free lettering worksheets, calligraphy alphabet pages, and Procreate brushes.
If you found this lesson helpful, consider sharing it with others. That’s the best, free way to support artists you appreciate.